
A modern operating system does not like being turned off on a dime, that is to say, being turned off before being shut down. For computers with a graphic interface this is as easy as pressing the right button. However, if a computer doesn’t have a screen or a mouse, like a Raspberry Pi (RPi) working as a server hidden away in a dark corner, this offers some difficulty. The only way to shut it down is by logging in through SSH and running the “shutdown -h now” command.
Een Nederlandse vertaling vindt u hier.
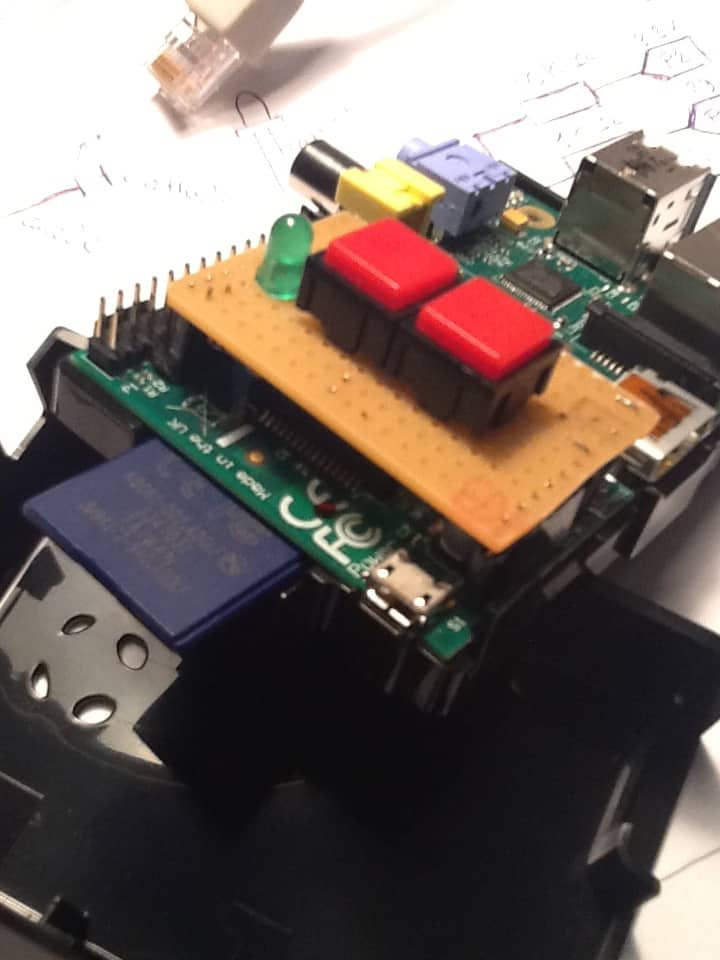
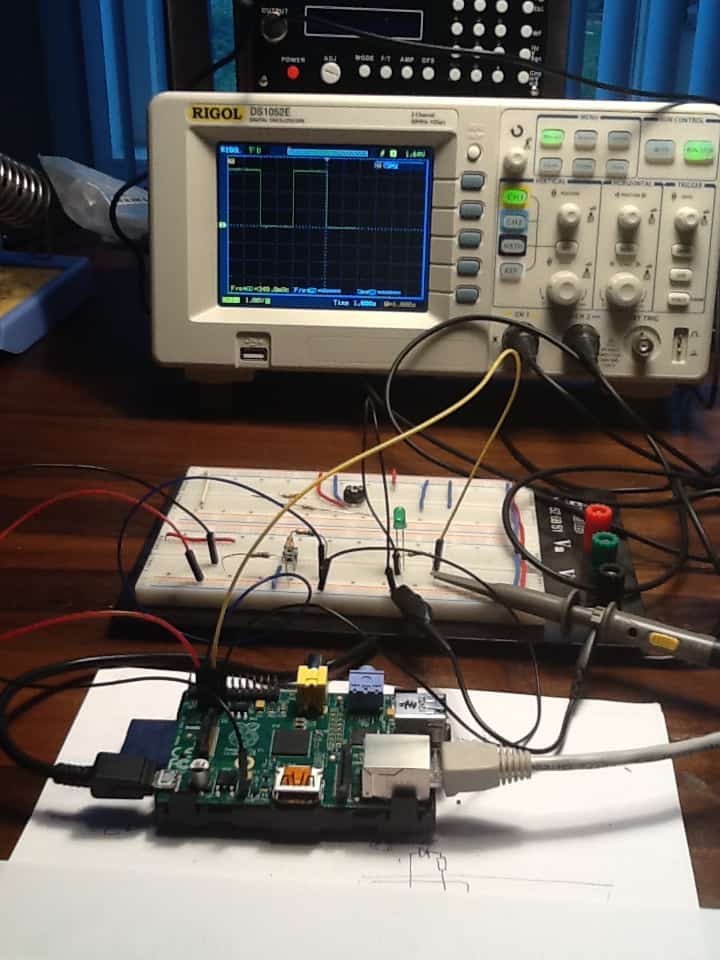
In this post I will explain a way to use software, two buttons, four resistors and one LED to shutdown or reset the RPi neatly.
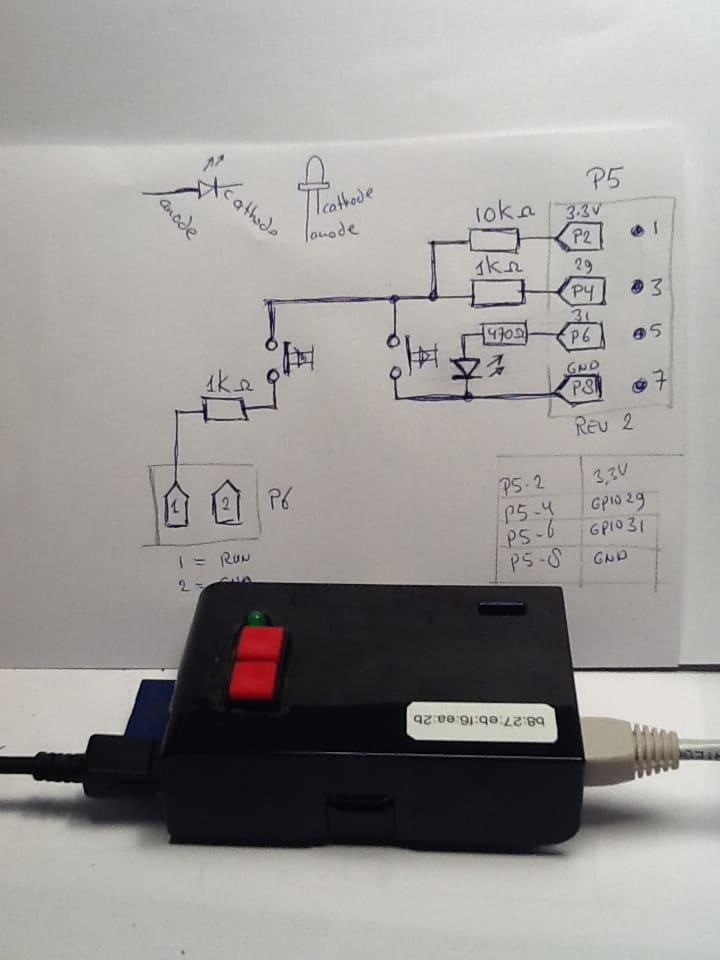
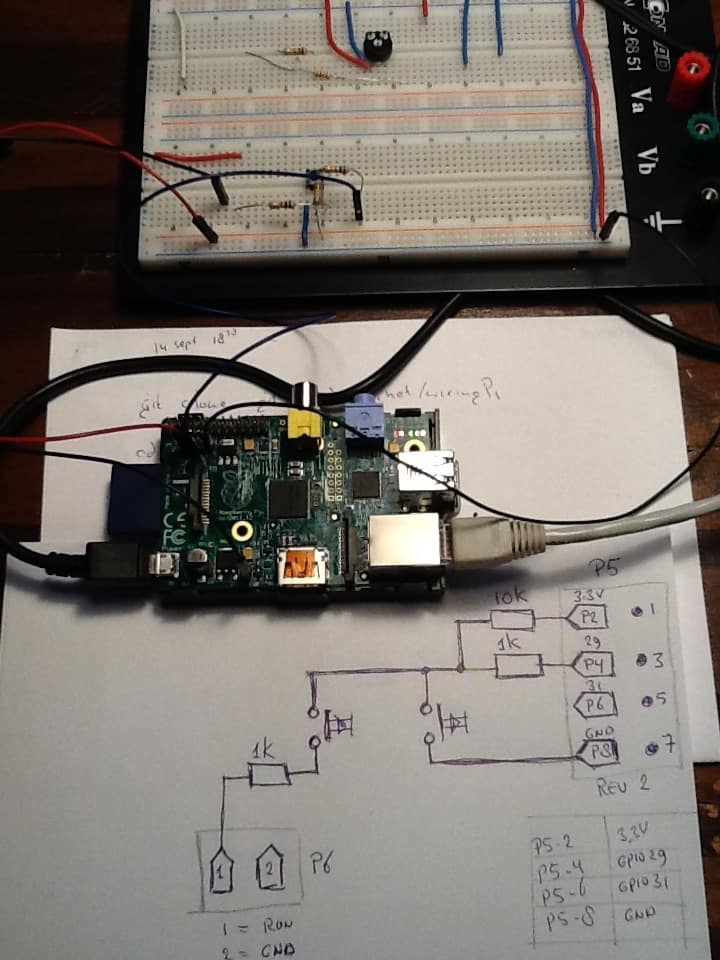
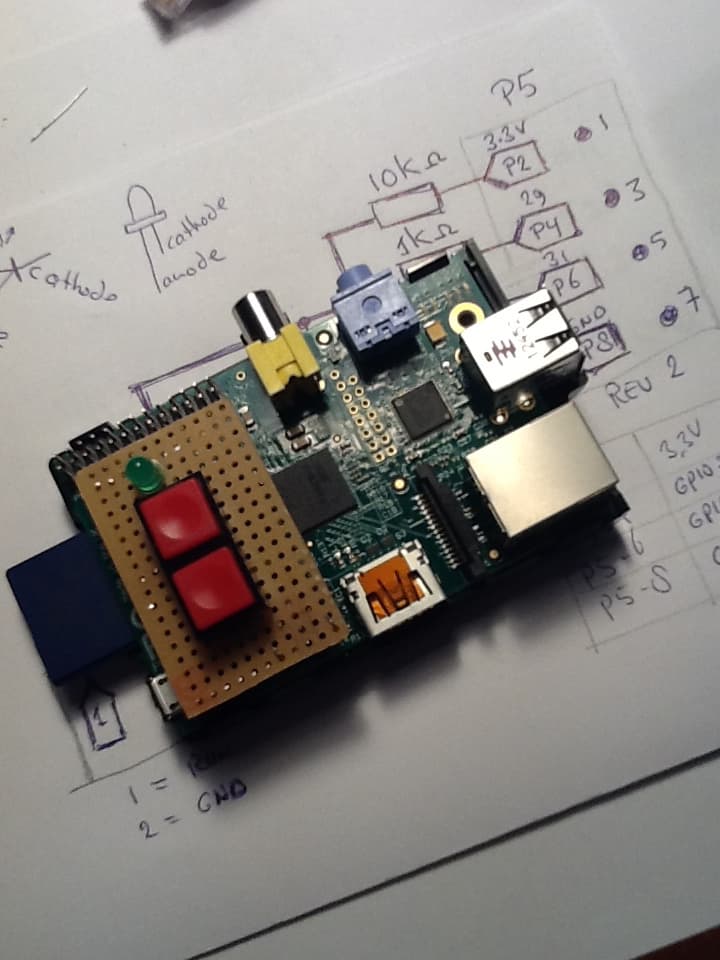
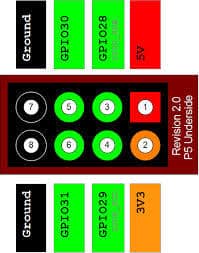
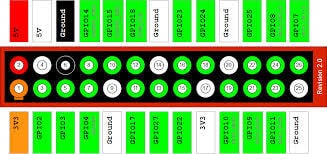
For this project I will use two General Purpose Input/Output (GPIO) ports on the RPi. These ports can be programmed as either Input ór an Outpot port. The RPi has several of these ports. These are found on the P1 connector, but there are also four ports on the Rev2 board at the P5 connector. The P5 connector needs to be soldered to the RPi. Because I plan on using the P1 connector for other purposes, I have chosen to use the P5 connector. If you want to use another port, you can change the software to select which GPIO port you want to use.
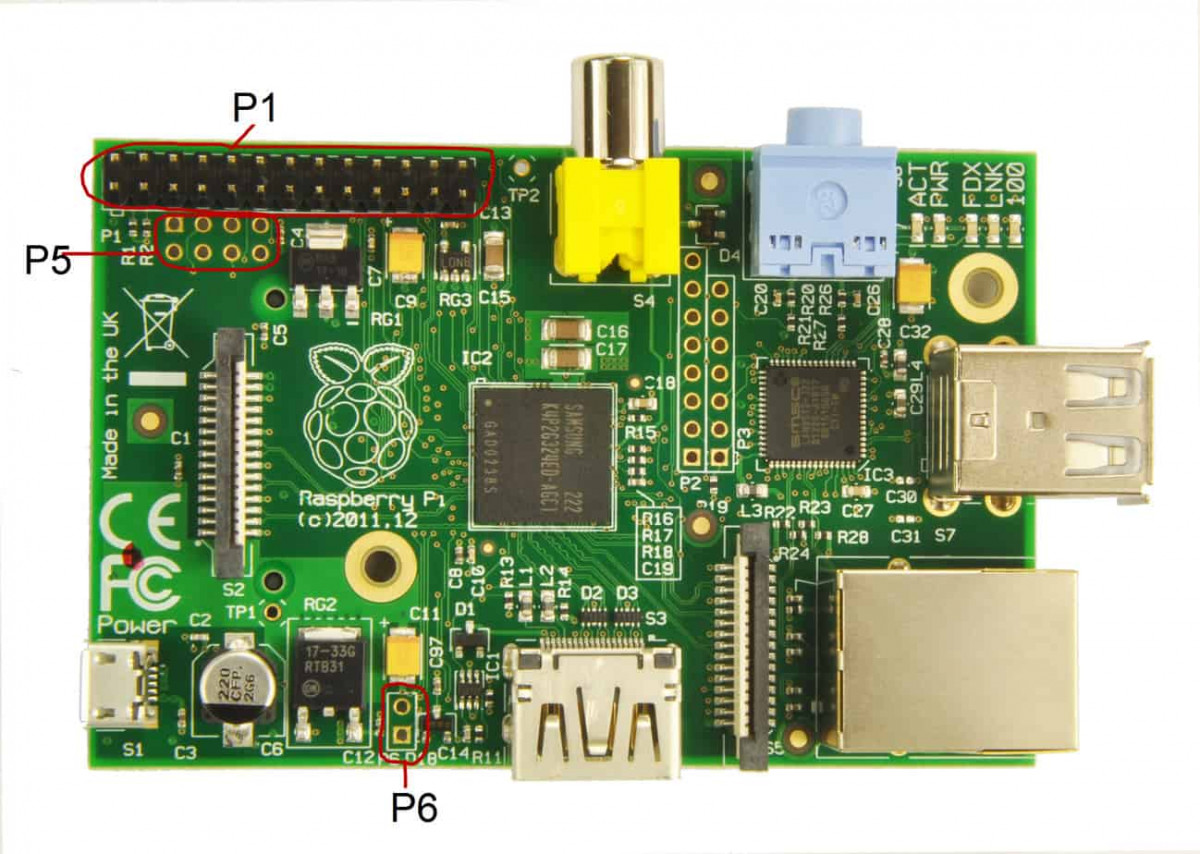
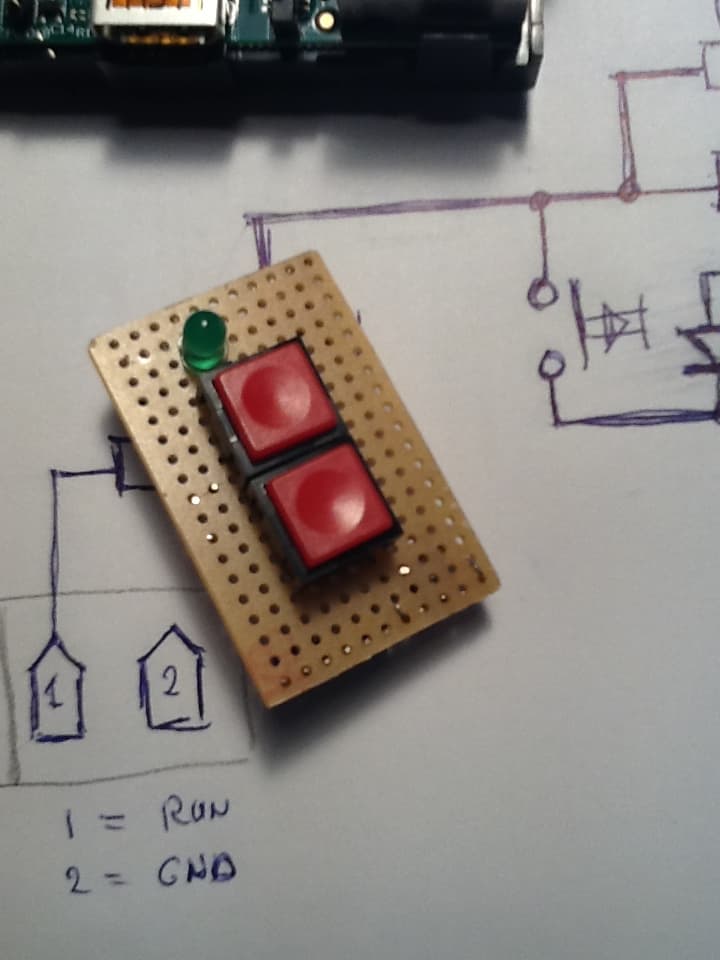
On the Rev2 boards of the RPi there is space for a connector which can be used to reset the RPi or to start the RPi after a “shutdown -h now” command. To do this, you need to solder a P6 connector on the RPi. By making pin 1 (the square on the illustration) “low” (connecting it with earth) the RPi will boot again.
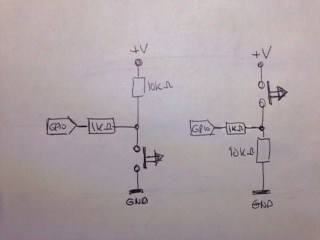
There are two ways to connect a switch to a GPIO defined as an input. In the example on the left the rest state for a GPIO port is set to “high” (+3V3). This is because the 10K ohm resistor draws the port to +3V3 (called a Pull-Up resistance). When the switch is pushed, the port changes to “low” (GND). The extra resistor in serie with the GPIO is not necessary, but it prevents a GPIO port which is defined as an output from burning down.
In the example on the right the rest state of the GPIO port is set to “low” (or GND, 0V). This is because of the resistor of 10K ohm pulls the port to GND (this is called the Pull-Down resistor). When the switch is pressed, the port becomes “high” (+3V3). In this example the extra resistor helps as a security barrier in case the port is defined as Output.
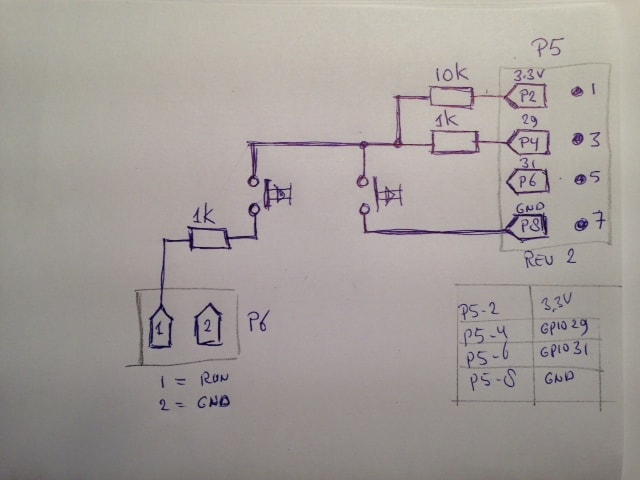
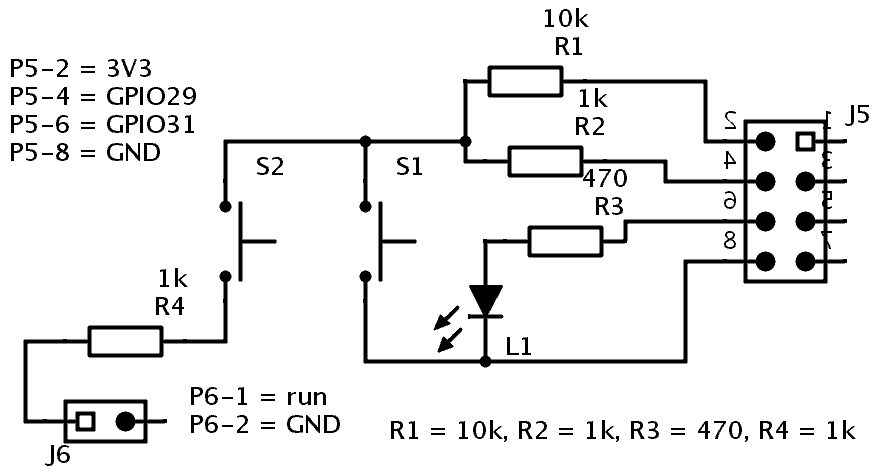
The schematic on the left shows how the RPi, with the use of some software, can be shutdown neatly. For me, the label “DO NOT PRESS” makes me curious to do the opposite. That is why I linked the reset button in series with the shutdown button and set the GPIO-Input in rest state to “high”. Pin 1 of P6 becomes “low” only when both buttons are pushed at the same time.
Because you don’t want the RPi to shutdown when the button is pushed by accident, this command is triggered at a delay which can be changed with the software (standard is between four and six seconds).
When testing these schematics I noticed that the lack of feedback is not helpful. By adding a LED –which is triggered via software– in to the chain it becomes possible to see the current state of the program. When software is running the LED flashes once every two seconds. When the shutdown button is pressed, the frequency changes to four times per second. When the LED start to emit constant, the shutdown command is executed.
This is the definitive schematic:
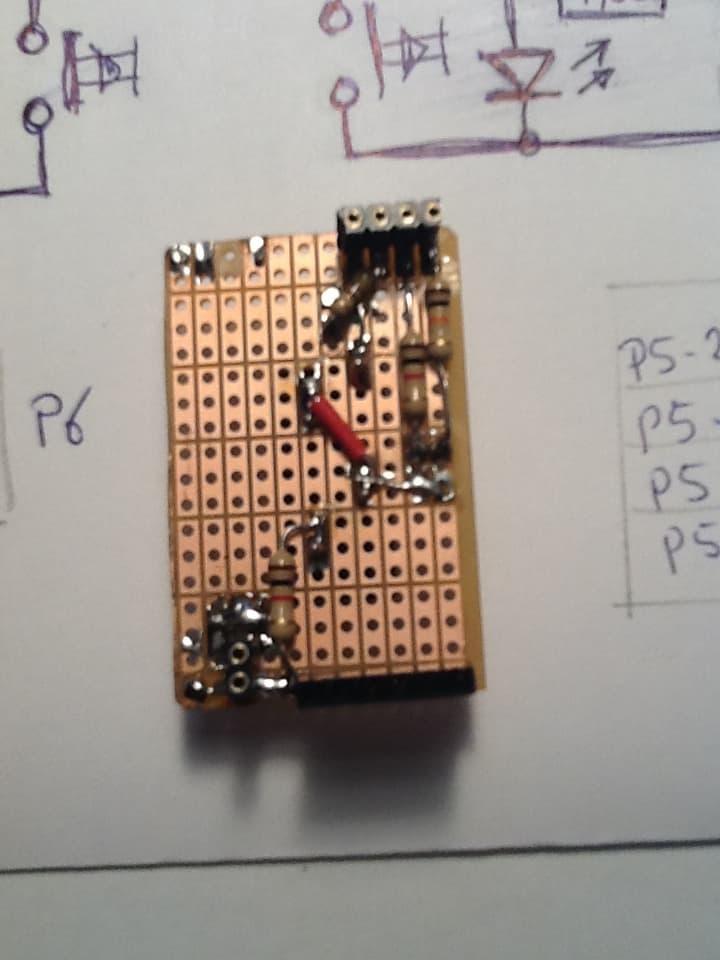
I soldered the different components onto a PCB-board in such a way that the print falls exactly over the pins of P5 and P6.
 |
 |
 |
 |
This is the code to control the GPIO port’s:
#!/bin/sh #-----------------------# # GPIOshutdown.sh # #-----------------------# BASENAME=basename ${0}PIDFILE="/var/run/${BASENAME%.sh}.pid" if [ -f ${PIDFILE} ]; then echo "${BASENAME} allready running..." exit else echo ${$} > ${PIDFILE} fi # # GPIO numbers should be from this list (P1) # 0, 1, 4, 7, 8, 9, 10, 11, 14, 15, 17, 18, 21, 22, 23, 24, 25 # # GPIO numbers should be from this list (P5) # 29, 31 # # Note that the GPIO numbers that you program here refer to the pins # of the BCM2835 and *not* the numbers on the pin header. # So, if you want to activate GPIO7 on the header you should be # using GPIO4 in this script. Likewise if you want to activate GPIO0 # on the header you should be using GPIO17 here. # GPIO_IN=29 # Input - change it into the port you want to use GPIO_LED=31 # Ouput - GPIO29 = P5-04, GPIO31 = P5-06 # # Set up GPIO_IN and set to Input echo "${GPIO_IN}" > /sys/class/gpio/export echo "in" > /sys/class/gpio/gpio${GPIO_IN}/direction # # test of input hoog is, anders is er niets op # deze GPIO_IN aangesloten... I=0 SW=cat /sys/class/gpio/gpio${GPIO_IN}/valueecho "value GPIO_${GPIO_IN} is [${SW}]" while [ ${SW} -eq 0 ]; do I=$((I+1)) if [ ${I} -gt 10 ]; then echo "..pfff" echo "GPIO_${GPIO_IN} niet aangesloten" rm -f ${PIDFILE} exit fi SW=cat /sys/class/gpio/gpio${GPIO_IN}/valueecho -n "${I}" sleep 1 done # # Set up GPIO_LED and set to output echo "${GPIO_LED}" > /sys/class/gpio/export echo "out" > /sys/class/gpio/gpio${GPIO_LED}/direction # I=0 # Duur van de KeyPress (Ticks-Teller) LED=0 # LED Aan=1, Uit=0 S=2 # Seconden sleep while true do sleep ${S} # if [ ${LED} -eq 1 ]; then echo "0" > /sys/class/gpio/gpio${GPIO_LED}/value LED=0 else echo "1" > /sys/class/gpio/gpio${GPIO_LED}/value LED=1 fi # SW=cat /sys/class/gpio/gpio${GPIO_IN}/valueif [ ${SW} -eq 0 ] then I=$((I+1)) # Tel het aantal Ticks dat de Key is ingedrukt S=0.25 # KeyPress, dan 0.25 seconden sleep echo -n "${I}" if [ ${I} -gt 16 ] then echo "..." echo "Key pressed for [${I}] ticks.." I=0 echo "1" > /sys/class/gpio/gpio${GPIO_LED}/value # Clean up echo "${GPIO_IN}" > /sys/class/gpio/unexport echo "/sbin/shutdown -h now" # Gebruik dit om te testen # /sbin/shutdown -h now # Gebruik dit voor productie rm -f ${PIDFILE} # Verwijder PID file sleep 5 # Settle down.. exit fi else I=0 # Toets is weer los gelaten, reset Ticks Teller S=2 # Sleep weer op 2 seconden zetten fi done # echo "0" > /sys/class/gpio/gpio${GPIO_LED}/value # # Clean up echo "${GPIO_IN}" > /sys/class/gpio/unexport #echo "${GPIO_LED}" > /sys/class/gpio/unexport # echo "Done...." #
Paste this code in to “/usr/local/bin/GPIOshutdown.sh” and then
sudo chmod +x /usr/local/bin/GPIOshutdown.sh
To run the program automatically when the RPi starts you have several options. I like running the program as ‘daemon’. If you want to run the program as daemon as well, paste the following code into a file called “/etc/init.d/GPIOshutdown”:
#! /bin/sh
### BEGIN INIT INFO
# Provides:          GPIOshutdown
# Required-Start:    $remote_fs $syslog
# Required-Stop:     $remote_fs $syslog
# Default-Start:     2 3 4 5
# Default-Stop:      0 1 6
# Short-Description: check if GPIO29 is low and shutdown the system
# Description:       check if GPIO29 is low and shutdown the system
#                    bla bla bla
### END INIT INFO
# Author: Willem Aandewiel (Willem@Aandewiel.nl)
#
# Do NOT "set -e"
# PATH should only include /usr/* if it runs after the mountnfs.sh script
PATH=/sbin:/usr/sbin:/bin:/usr/bin
DESC="check GPIO input for LOW and halt the system"
NAME=GPIOshutdown
DAEMON=/usr/local/bin/${NAME}.sh
DAEMON_ARGS=""
PIDFILE=/var/run/$NAME.pid
SCRIPTNAME=/etc/init.d/$NAME
# Exit if the package is not installed
[ -x "$DAEMON" ] || exit 0
# Read configuration variable file if it is present
[ -r /etc/default/$NAME ] && . /etc/default/$NAME
# Load the VERBOSE setting and other rcS variables
. /lib/init/vars.sh
# Define LSB log_* functions.
# Depend on lsb-base (>= 3.2-14) to ensure that this file is present
# and status_of_proc is working.
. /lib/lsb/init-functions
#
# Function that starts the daemon/service
#
do_start()
{
    # Return
    #   0 if daemon has been started
    #   1 if daemon was already running
    #   2 if daemon could not be started
    start-stop-daemon --start --quiet --background --pidfile $PIDFILE --nicelevel 19 --exec $DAEMON --test > /dev/null \
        || return 1
    start-stop-daemon --start --quiet --background --pidfile $PIDFILE --nicelevel 19 --exec $DAEMON -- \
        || return 2
    # Add code here, if necessary, that waits for the process to be ready
    # to handle requests from services started subsequently which depend
    # on this one.  As a last resort, sleep for some time.
}
#
# Function that stops the daemon/service
#
do_stop()
{
    # Return
    #   0 if daemon has been stopped
    #   1 if daemon was already stopped
    #   2 if daemon could not be stopped
    #   other if a failure occurred
    start-stop-daemon --stop --quiet --retry=TERM/30/KILL/5 --pidfile $PIDFILE --name $NAME
    RETVAL="$?"
    [ "$RETVAL" = 2 ] && return 2
    # Wait for children to finish too if this is a daemon that forks
    # and if the daemon is only ever run from this initscript.
    # If the above conditions are not satisfied then add some other code
    # that waits for the process to drop all resources that could be
    # needed by services started subsequently.  A last resort is to
    # sleep for some time.
    start-stop-daemon --stop --quiet --oknodo --retry=0/30/KILL/5 --exec $DAEMON
    [ "$?" = 2 ] && return 2
    # Many daemons don't delete their pidfiles when they exit.
    rm -f $PIDFILE
    return "$RETVAL"
}
case "$1" in
  start)
    [ "$VERBOSE" != no ] && log_daemon_msg "Starting $DESC" "$NAME"
    do_start
    case "$?" in
        0|1) [ "$VERBOSE" != no ] && log_end_msg 0 ;;
        2) [ "$VERBOSE" != no ] && log_end_msg 1 ;;
    esac
    ;;
  stop)
    [ "$VERBOSE" != no ] && log_daemon_msg "Stopping $DESC" "$NAME"
    do_stop
    case "$?" in
        0|1) [ "$VERBOSE" != no ] && log_end_msg 0 ;;
        2) [ "$VERBOSE" != no ] && log_end_msg 1 ;;
    esac
    ;;
  status)
    status_of_proc "$DAEMON" "$NAME" && exit 0 || exit $?
    ;;
  restart)
    #
    # If the "reload" option is implemented then remove the
    # 'force-reload' alias
    #
    log_daemon_msg "Restarting $DESC" "$NAME"
    do_stop
    case "$?" in
      0|1)
        do_start
        case "$?" in
            0) log_end_msg 0 ;;
            1) log_end_msg 1 ;; # Old process is still running
            *) log_end_msg 1 ;; # Failed to start
        esac
        ;;
      *)
        # Failed to stop
        log_end_msg 1
        ;;
    esac
    ;;
  *)
    echo "Usage: $SCRIPTNAME {start|stop|status|restart}" >&2
    exit 3
    ;;
esac
:
Don’t forget to
sudo chmod +x /etc/init.d/GPIOshutdown
To start the daemon type:
sudo /etc/init.d/GPIOshutdown start
The LED starts blinking.
To stop the daemon type the commando:
sudo /etc/init.d/GPIOshutdown stop
The LED turns off.
To start the daemon automatically with every reboot of RPi, you have to install the service with the command:
cd /etc/init.d

sudo insserv GPIOshutdown
Rest assured that the script does not take up too much of the available processor capacity. When the ‘sleep’ command is ran, it uses almost no processor time.
Please Note: the P5 connector is meant to be soldered to the bottom of the RPi. Because I found this inconvenient for this particular project, I soldered it to the top (component side). Because of this, the Pin numbers are in the wrong order. The squares on the RPi-board always mark pin 1.
I only used the even pin-numbers where the +3V3 is on the outside of the RPi.
 |
 |
 Follow
Nadat ik iets toevoegde in het config file krijg ik de placeholder page niet meer tevoor-schijn. Ik tik in :~$ sudo /etc/init.d/lighttpd restart
Duplicate config variable in conditional 0 global: fastcgi.server
2015-08-31 23:56:15: (configfile.c.957) source: /etc/lighttpd/lighttpd.conf line: 47 pos: 23 parser failed somehow near here: (EOL)
Als ik sudo netstat ntulp intik krijg ik het volgende:
Active Internet connections (only servers)
Proto Recv-Q Send-Q Local Address Foreign Address State PID/Program name
tcp 0 0 0.0.0.0:445 0.0.0.0:* LISTEN 17001/smbd
tcp 0 0 127.0.0.1:3306 0.0.0.0:* LISTEN 1295/mysqld
.
.
udp6 0 0 :::41569 :::* 598/avahi-daemon: r
udp6 0 0 :::5353 :::* 598/avahi-daemon: r
udp6 0 0 :::27396 :::* 1417/dhclient
Wat ziet U dan?
Ik heb eerst via arachnoid.com kennis gemaakt met mysql en dat geinstalleerd. Later heb ik xbmc geinstalleerd en toen overgestapt op kodi, daardoor liep het allemaal niet zo soepel meer. Nu probeer ik lighttpd te installeren samen met php en phpmyadmin om een webside op te starten.
Nou zegt U ergens van voor af aan opnieuw beginnen, moet ik dan niet eerst alles de-installeren en hoe doe ik dat?
scriptje s.v.p.
Beste J. Hartog,
Ik heb zo snel geen idee wat je tracht te bereiken en hoe ik je daarbij zou kunnen helpen.
De RPi (de “oude” versies zonder de quad core) zijn in mijn ervaring niet geschikt voor Kodi of xbmc. Wil je toch Kodi draaien, dan kun je het beste een image van hun website downloaden en deze op een SD kaartje zetten.
“Opnieuw beginnen” betekend meestal dat je een recente image van een RPi OS download en op een SD kaartje zet om vervolgens hierop aanpassingen te doen. Baby stapjes!
Succes!
Pingback: Shutdown Headless Raspberry Pi | Willem's Website
How did I end up here!! Recognize your writing, still. Hope you are doing very well!!