[ 26,306 keer bekeken / views ]

In 1976 I bought my first computer. That was at a time when there was no internet, there where no PC or Apple’s! Computers where meant for big company’s like insurance compagnies and multi nationals. No one had a computer at home. It was the time of the Homebrew Computer Club and Byte magazine. I had a Byte magazine subscription and at a certain point there was an advertisement in it from MOS-Technology for a single board computer called the KIM-1.
Also read my post about a 32kb Memory Expansion for the microKIM

If I remember correctly, I, one-way-or-an-other (remember, there was no internet, no email, no PayPal. only had The Yellow Pages and a Phone Book from the city of Amsterdam), found a distributer in the Netherlands where I ordered this piece of magic.
Much later, in 2016,I went to the Apple Museum Nederland in Orvelte and that visit was a trip down memory lane.
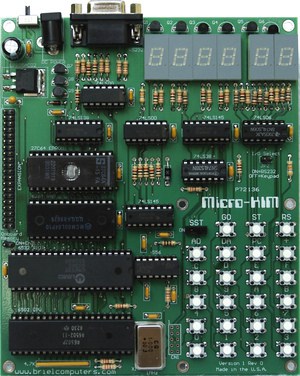
Searching the net I found there are quit a lot of Apple ][ emulators and replica’s, but there was also a KIM-1 replica, called the microKIM. I bought the microKIM as a kit from Vincent Briel but due to some missing and some wrong parts (mainly a 65C02 processor that did not comply with the timing of the original 6502 processor and the microKIM design) it took me almost a year and the help of Timothy Alicie (who had a solution for the timing problem) and Jac Goudsmit to get the microKIM working.
The microKIM is as close to the original as possible. There are some differences in the hardware due to the unavailability of some parts and newer parts that are more capable than the parts that where available in the 1970’s. Vince designed a RS232 interface as a replacement for the original TTY interface. So you can connect the microKIM to a computer with a “RS232 to USB” cable and program the microKIM from a terminal program (I use CoolTerm).
From a software point of view the extra RAM (5 kilobyte in stead of 1 kilobyte) and the absence of the first timer at address $1704 (5,6,7) are important. Only the timer at address $1744 (5,6,7) is available which you have to take into account if you want to use a program written for the original KIM-1.
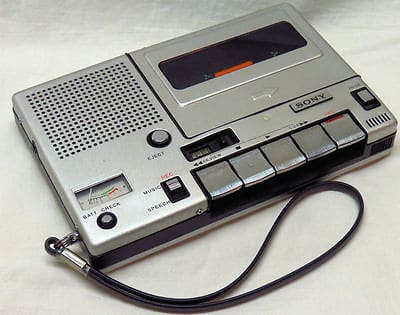
To get “the real vintage feeling” I wanted to design a “solid state” cassette interface that “works” like a real cassette recorder. With the original KIM-1 it was possible to store more than one program on a cassette tape and by keeping track of the tape-counter (writing it down on the cassette) one could position the tape at the start of a particular program, punch in some magic numbers on the KIM-1, press the “GO” button to start the tape-loading program and then press the “play” button on the cassette recorder. Some squeezing sounds (like the one you might know from the early modems) later and after a few minutes the program was loaded into the KIM-1.
Recording was similar with some other magic numbers and pressing the “record” and “play” button on the cassette recorder simultaneously.
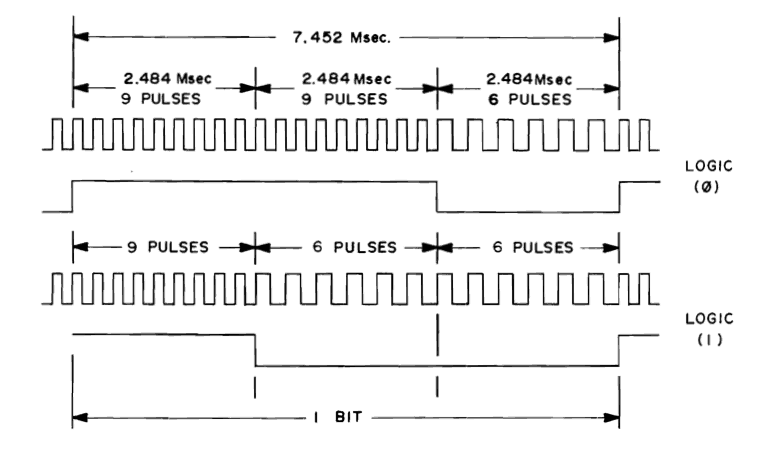
A program is recorded to tape using two frequency’s; 3.623 Hz and 2.415 Hz to convert ‘1’ and ‘0’ bits to a pulse-train.
Decoding the pulse-train
I tried to let the ESP8266 decode this pulse train but the timing is too tight to decode the train into bits and also be able to convert the bits in bytes and store them to a file. So I fell back to the mighty little ATtiny85 processor to convert only the pulse train to ‘1’ and ‘0’ bits and feed the bits to the ESP8266 for further handling. The duration of one bit takes 7.452 milli seconds.
To distinguish between a ‘1’ or ‘0’ bit the ATtiny only has to record the duration of the change in frequency from long- to short- and from short- to long-pulses. It starts a timer at the moment the pulse duration changes from approx. 414 µSeconds to 276 µSeconds. The timer stops at the moment the pulse changes back to ~414 µSeconds.
If the duration is shorter than 3.726 milli seconds it has found a ‘1’ and makes the output pin High and if the duration is longer than 3.726 milli seconds it has found a ‘0’ and it makes the output pin Low.
To load a program from the Tape Device to the KIM we can skip the modulation to the 3kHz and 2kHz frequency’s and simply feed the one’s and zero’s to the KIM.
Design Goals
The Tape Device user interface must consist of the four buttons found on every cassette recorder. A “fast rewind”, “record”, “play” and “fast forward” button (on the real cassette recorder there also is a “stop” button but we won’t use that button in this design).
Because of the today’s possibilities and state of technology we can store a large amount of program’s on a small device so we need a way to present to the user where we are on the “tape” but we can present more than just a tape-counter. Wouldn’t it be nice if, besides the tape-counter, there was room for a description of the program and maybe the start address to run the program from. And because a large number of program’s can be stored on this device it would also be nice to be able to write-protect a program so it can’t accidentally be overwritten.
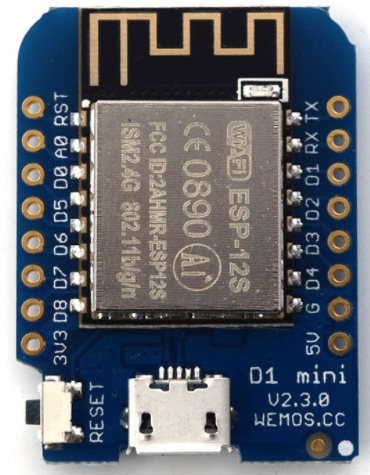
I have chosen to use a ESP8266 processor on a small board from Wemos (the Wemos D1 mini). From the EEPROM memory of the ESP8266 about 3 Megabytes is used as a filesystem to store programs.
This Wemos D1 board has an USB port to program the ESP8266 and that port can also be used as an interface to a computer, which we will use to enter a description to a program and to make the program Read Only or Read/Writable.
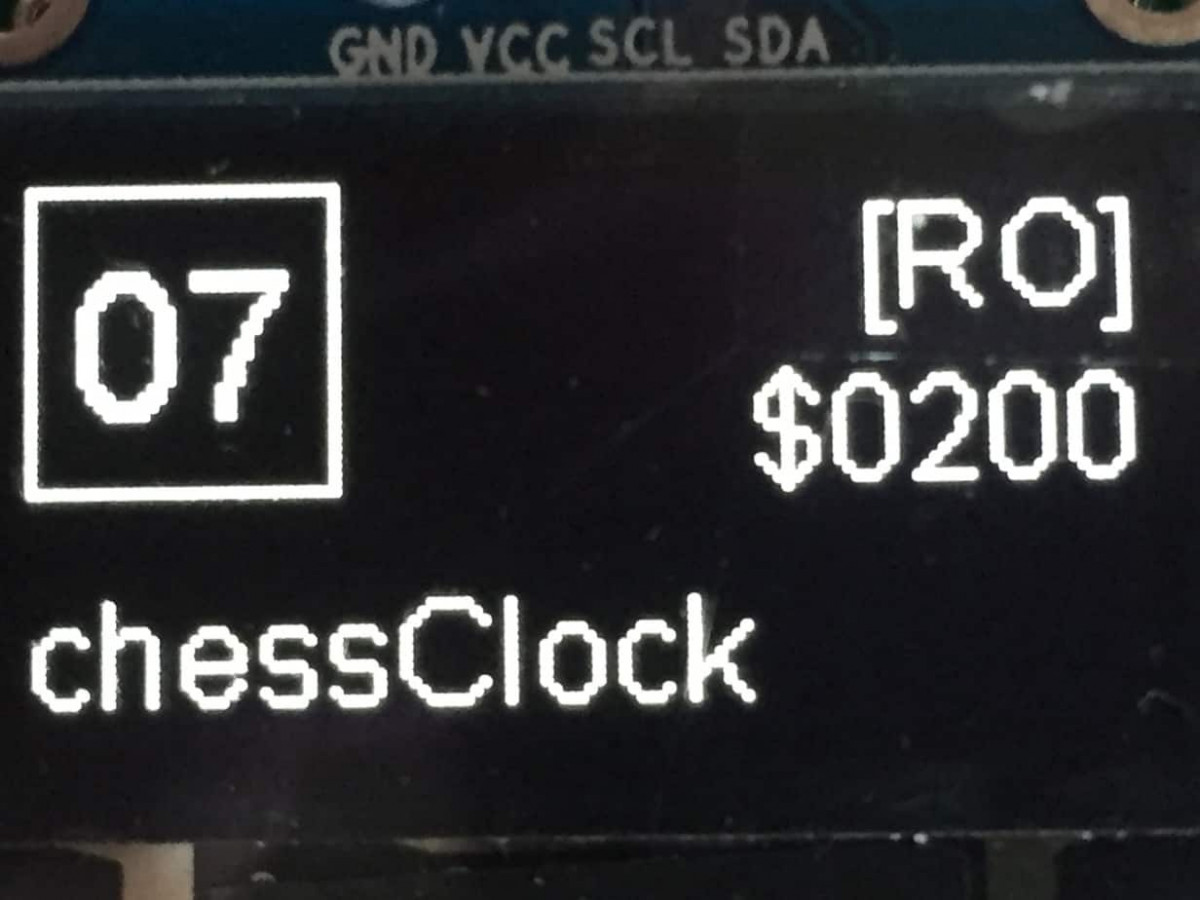
For the display the SD1306 with an I2C interface is perfect. This picture shows that as sequence $07 (it’s a hexadecimal number) a program with the description “chessClock” is stored. The program is “Read Only” and the start address is $0200.
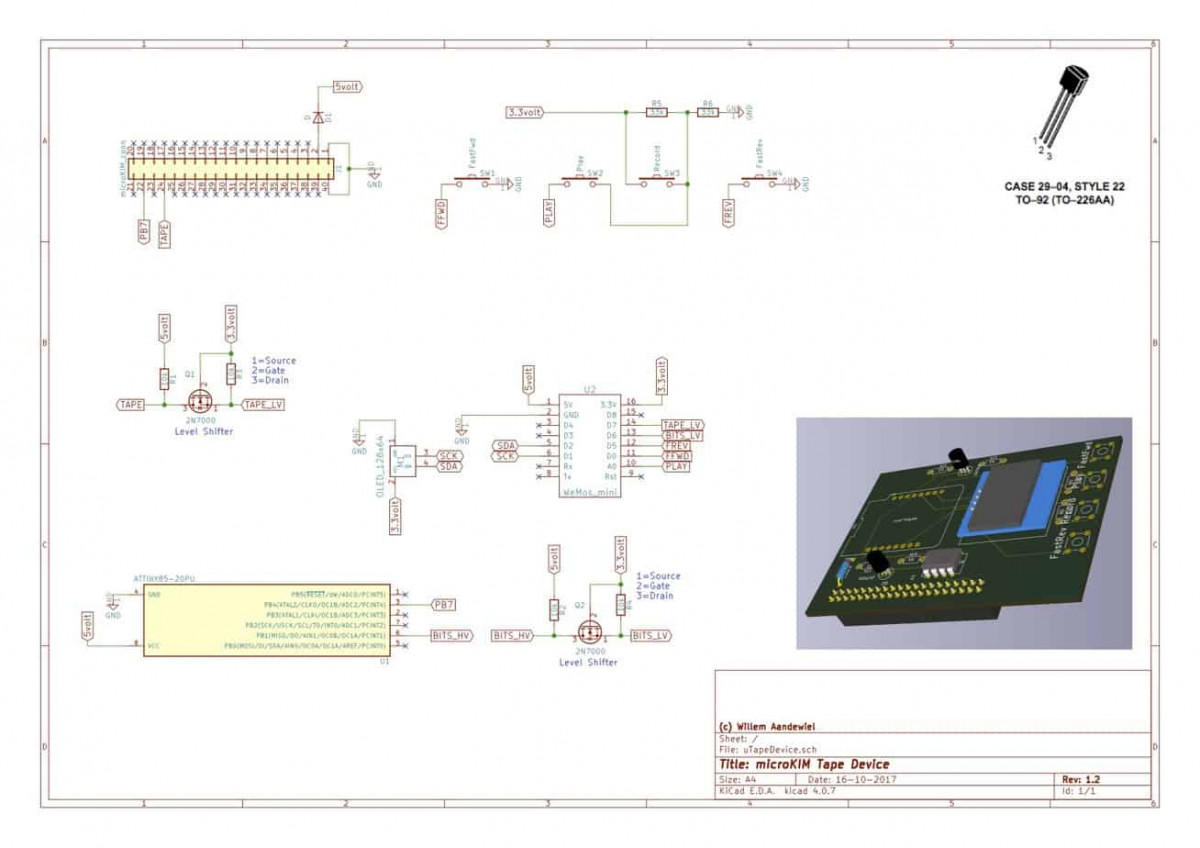
The KIM is a 5 volt device and the ESP8266 is a 3.3 volt device (the ATtiny can be both, but we power it with 5 volt) so to connect signals to one-another, level shifters are necessary. N-Channel MosFets are ideal suited for this task.
Version 2.0 of the firmware and the hardware is out! It is better, faster, nicer, more user friendly! Read all about it!
This is the hardware design:
The software for the ATtiny and the ESP8266 can be found on GitHub.
And here you find a short demo of the KIM Tape Device:
 Follow
Your work (above) is a noble attempt to replace a linear tape drive with a computer. I rejected this ages ago. Have a look at this for a fast error free alternative.
8kb download of MS Basic <3 seconds. Seamless interface tpo RAE
Cheers, Rob W
Hi Rob,
Nice project!
Although I don’t see the difference of your project in relation to the dTR. Both use an external MPU. Both use WiFi (although I don’t see what you use it for) and both use an external filling system.
The footprint of the dTR is much smaller though..
Dag Willem.
We hebben een aantal dingen gemeen: ook ik kocht in 1977 de KIM1 en heb daar vele uren aan geprogrammeerd en diverse dingen geschreven voor de KIM kenner waar ik lid van was. En ook ik heb PPL , vlieg ondanks m’n 72 jaar nog wekelijks. Nu ik wat meer tijd heb heb ik je Solid State Tape device gebouwd voor de KIM1. De ATtiny85 geprogrammeerd en de Wemos D1 voorzien van een demoprogramma en werkend op de SD1306.
Het probleem waar ik tegen aan loop is de file; bij het compileren krijg ik de melding ‘DISPLAY_WIDTH’ was not declared in this scope.
Als ik in GitHub zoen op ssd13206.h krijg ik 35 results. De results met hoofdletters SSD heb ik allen geprobeerd. Als ik in jouw programma de SSD1306.h wijzig in krijg ik weer heel andere problemen.
Vraag: Welke bibliotheek heb je destijds gebruikt en, als die er niet meer is , kan je me door jouw gebruikte bibliotheek doen toekomen ? En, als het eenmaal werkt, ben ik nog wel benieuwd hoe je de teksten in het geheugen krijgt. Dat is van later zorg. Ik hoop dat je me kunt helpen anders zit er niets anders op het programma te herschrijven voor de nieuwe grafische bibliotheek ? Groet van Dirk
Hi Dirk,
Wat bijzonder! Ik was indertijd ook lid van de HCC KIM club (of zo iets) waar, tijdens een voordracht/clubmeeting iemand van Apple de Apple][ demonstreerde. Véél te duur voor mij maar toch voor elkaar gekregen dat ik zo’n Apple][ board (los!) kon kopen. Daar hield het voor mij wel zo’n beetje op met de KIM-1 .. tot ik tegen die microKIM aanliep.
Waar vlieg jij? Mijn vriend heeft een Cirrus op Lelystad Airport staan maar ik merk dat het voor mij toch te snel gaat en te complex is…
Ik hou me, sinds mijn “early Retirement”, vooral bezig met leuke dingen zoals elektronica en programmeren (zoals op deze website).
Anyway: Blijkbaar zijn de #defines van
DISPLAY_WIDTHenDISPLAY_HEIGHTuit de bibliotheken verdwenen dus heb ik ze in de source code gezet. Als je die nieuw van github haalt moet het werken. De library waar hij bij mij tegenaan compileert is:ESP8266_and_ESP32_OLED_driver_for_SSD1306_displays@4.1.0Als je de emulator met een USB kabeltje aan je computer verbind en de Arduino IDE start, kun je via het Serial Console naar hartelust programma namen en andere zaken regelen.
Succes en veel plezier!
Hello again Willem..
As you could se on some of my pictures, I store the programs om SD-disks so I can change the disks, if necessary:
AIM65
and that part works now. The files will be made, but for now, there is nothing in them.:(
I use a PRO MINI for the PLL, but nothing comes on PIN7, so I wonder…
About the ESP8266 – I have an ESP-12F and I also have a display to match yours, but because of earlyer experience with SDfat.h and the display on my picture, I was thinking to make a two-tape station, so i could use the power and the lot of programspace of the MEGA2560, but my though could be in a wrong way.
The plan was to be able to read from one SDdisk and write to another, for assembling big data. For the moment I use only 11 % of programspace and 41 % of the dynamic memory.
I do NOT YET have any experience with the ESP’s so that was send to a new project 😉
Hello again Willem..
Thanks for your fast reply..
So I just comment this makro out.
I will post you the program, when finished it, if ever… 😉
Regards Palle
Palle,
I was overthinking your attempt to rewrite the KIM Tape device for your AIM65 with a MEGA2560 … but I’m wondering: where are you going to store the program files? With only 4K of EEPROM there is not much of a program to be stored. Also: you have to write your own filesystem.
Is it not better (easier) to just stick too the ESP8266 (WEMOS D1)? You then have plenty of room to save AIM65 program files and probably much easier migration from the KIM-1 to the AIM65!
Hi Palle,
The dPrint macro’s are there only to give you some feedback during debugging.
As the MEGA is to small to include the printf() functionality it is the easiest to just change the #define xprintf() to nothing.
Something like:
#define dprintf(…)
with noting after it.
Mind you, I have not tested this…
Hello again Willem..
Well, my project is running on a MEGA2560, and so far I have some problems with your formating definition in the beginning of your program.
Arduino IDE will not accept the definition dprintf… and there I am a beginner in C-coding.
I use I2C for 4×20 LCD-display, and for the moment, I have the knowing sound out and also some of it back, but not perfect yet. My experiment: AIM65
I cane NOT make this working:
#define dprintf(…) {if (doVerbose) { Serial.printf(__VA_ARGS__); } }
Is it possible to rewrite this MAKRO so it works with MEGA 2560?
About:
** Program : uTapeEmulator v4
** Copyright (c) 2017 Willem Aandewiel
PLAYBACK: line nr: 108 -> dPrint(“Send ‘*’ (0xA2)”);
—————————————————————-
I try to make this project, modified to MEGA2560 and 4×20 lcd-display, all for AIM65.
The monitor listning says “2A” NOT “A2” for “* – ASTERIX”.
Could this be an error i my system?
A very interesting project… Congratulation…
@Palle: Moved your comment to “Solid State Tape Device for the (micro)KIM”
Hi Palle,
Nice you like my project.
According to the ASCII tabel an asterisk (*) has decimal code 42, octal code 052 and hexcode “0x2A”.
As it is only a debug line that is not send to the tape (the next line
sendOneByte('*');is) so it does not matter too much, but you are right: the code “0xA2” is not correct (0xA2 is not even a valid ascii code).Thanks for sharing and please tell me your progress to make this work for the AIM65!
Pingback: Always wanted to own a PDP-11? Now you can! | Willem's Website
Hallo all-male
Is het mogelijk het dat PCB ergens te kopen.
Groetjes vanuit verschneuwd Germany.
Hi Jan,
I’m afraid I have not made a PCB for the Solid State Tape Device, but you can built it quite simple with a standard PCB like this one or this one.
I can send you the KiCAD files and than you can send them to a PCB maker (I’m very fond of PCBWay; fast and cheap).
Regards
Leuk project!
Het lijkt mij leuk om eentje maken voor mijn Multitech MPF-1 single board computer. Dat lijkt me met een aanpassing van _SHORT, voor de andere frequenties, in de code voor de ATTINY85 wel goed te doen.
Helaas zit op de MPF-1 pin PC7 van de 8255 voor het output signaal niet op de connector, kijken of die ergens af te tappen is. . . .
Hi Hessel,
Nice you like my project.
It looks like the MPF-1 tape interface is about half the speed of the KIM-1. So it most certainly is possible to use the Solid State Tape Device for the MPF-1.
Indeed you have to wire the PC7 (and PA7?) pin(s) to the SSTD. You may also have to change the timing of the playbackTape function (#define _SHORT) if the MPF-1 does not like the high speed playback and of course the “#define _SHORT” in the ATtinyPLL program to reflect the 2kHz tones.
Keep me posted on your progress!
Pingback: ESP8266 as a Tape Drive
Pingback: ESP8266 as a Tape Drive – High Tech Newz