
[ 15,203 keer bekeken / views ]
I developed hardware for a friend to control the underfloor heating of his house more effectively and efficiently. To test this hardware I wrote software with the Arduino IDE. For me the only way I knew.
Je kunt een Nederlandse versie van deze post hier vinden
This friend, a professional software engineer, took my software and adapted the functionality to his wishes and requirements. But due to his experience, he was never able to get used to the way you develop software with the Arduino IDE. For him it was all very “unnatural”.
At some point he discovered Visual Studio Code and with that IDE in collaboration with the “PlatformIO” extension he was able to develop software for his measurement and control systems in a way that was “natural” for him.
I also looked at Visual Study Code with the PlatformIO extension (from now on just called “PlatformIO”) but quickly got stuck due to the rather steep learning curve.
Ultimately, I made the switch for new projects and became very enthusiastic. Also because I now use Visual Studio Code (VSC) not only for developing software for MCUs, but also for developing Python and openSCAD programs. Everything with one IDE (with different “extensions”), which increases productivity because you do not have to switch IDEs every time.
One of the biggest problems I have with the Arduino IDE and Arduino projects is that it is difficult to determine which version of libraries you use for a project and what type of MCU and the associated settings you should select to compile and flash a project.
Because I publish many projects on this website and these are recreated by more or less experienced makers, it appears every time that I have not described things well (enough) and/or that makers do not have the patience to read everything properly. But a bigger problem is that over time core software and libraries are also updated and that core software suddenly gets completely different settings and options (which no longer match my description) and that newer libraries are not always compatible with the version that I used for the project.
PlatformIO has a brilliant solution for this by using a ‘platformio.ini’ file for every project in which all these things are recorded. The platform (in Arduino language the core used), the type of board (NodeMCU, Arduino UNO, ATtiny85, etc.) and which libraries are used in a project is fixed in the platformio.ini file where you can also specify that you want a specific version of a library you want to use. The “platformio.ini” file is part of the entire project and you don’t have to install or figure out anything yourself. Simply opening a project folder and compiling ensures that all necessary (external) core files and libraries are downloaded with the correct version (this is very fast and only needs to be done the first time you compile a project).
Example of a “platformio.ini” file
  ; PlatformIO Project Configuration File
  ;
  ;   Build options: build flags, source filter
  ;   Upload options: custom upload port, speed and extra flags
  ;   Library options: dependencies, extra library storages
  ;   Advanced options: extra scripting
  ;
  ; Please visit documentation for the other options and examples
  ; https://docs.platformio.org/page/projectconf.html

  [platformio]
  workspace_dir   = .pio.nosync
  default_envs    = myBoard

  [env:myBoard]
  platform        = atmelavr
  board           = uno
  upload_protocol = usbtiny
  framework       = arduino
  monitor_speed   = 19200
  upload_speed    = 19200
  upload_port     = #select port like "/dev/cu.usbserial-3224144"
  build_flags     =
            -D DEBUG
  lib_ldf_mode    = deep+
  lib_deps =
            marcoschwartz/LiquidCrystal_I2C@^1.1.4
            chris--a/Keypad@^3.1.1

  monitor_filters =
Now that I am using PlatformIO for new projects, I would also like to convert my existing Arduino projects to the PlatformIO structure. But that turns out to be less easy than you might think (or hope).
There are manuals on the internet that describe this process, but they are often incomplete and almost all assume a simple project with only one ‘.ino’ file.
I thought: there must be a better way
In order to convert an Arduino project to a PlatformIO structure, it is important to understand how the Arduino IDE “works” and what this IDE does to compile a project.
The Arduino IDE does a number of things behind the scenes (or under the hood) with the ‘.ino’ files that make up the project.
Merging .ino Files
The Arduino IDE starts the compilation process by pasting all the ‘.ino’ files in your project together into one large combined file. This is done in alphabetical order of the file names. Imagine you have three files: ‘myProgram.ino’, ‘sensor.ino’ and ‘display.ino’. The IDE merges these in the order ‘myProgram.ino’, ‘display.ino’ and ‘sensor.ino’. This means that the order of the files can affect the behavior of your code, especially if functions in different files call each other.
Creating Function Prototypes
After the files are merged, the Arduino IDE scans the combined file looking for any functions you defined. Then the IDE automatically creates prototypes for these functions and places them at the top of the combined file. A function prototype is a declaration of a function that specifies what type of value the function returns and what arguments the function expects, without the full function implementation. This allows the compiler to call functions defined later in the file, which would normally not be possible without prototypes (by default in C or C++ a function cannot be used until it is defined before the call).
Global variables
If you declare a variable outside a function (i.e. not inside the curly braces ‘{}’ of a function), then by merging all ‘.ino’ files through the Arduino IDE, this variable is global and available to all functions in all merged ‘.ino’ files. For example, a variable ‘int sensorValue;’ declared in ‘sensor.ino’ can be used in ‘myProgram.ino’ or ‘display.ino’ without any problems.
Inclusion of Libraries with ‘#include’
When using external libraries in an Arduino project you must import them with the ‘#include’ directive. If you import a library into a single ‘.ino’ file, this will apply to the entire combined file once merged by the IDE.
Duplicate ‘#include’ directives
It is not necessary, but also not harmful, to place the same ‘#include’ directive in multiple ‘.ino’ files. The compiler ensures that a library is only added once, even if the ‘#include’ directive, by merging all ‘.ino’ files, appears multiple times. This is because most libraries protect themselves against double inclusion by using ‘#ifndef’ and ‘#define’ (so-called ‘Header Guards’) directives in their header files.
Compilation as one Program
Now that the files have been merged and the prototypes created, the IDE treats the result as a single file. This means that the code is now compiled as if it were a single ‘.ino’ file. The compiler runs through the code, translates it into machine instructions, and checks for syntax and semantic errors. Because everything is now in one file with all functions as a “prototype” at the beginning of the merged file, functions in different files can communicate with each other without any problems, without the user having to worry about the order of the function definitions.
And what does a PlatformIO project look like?
When you start a project with PlatformIO, you get a structured folder where you can store all your code, settings, and other files. This structure helps you keep an overview, especially as your project grows.
The project folder consists of at least a ‘platformio.ini’ file and two folders containing all the code. These folders are “src” where all the “.c” and “.cpp” files of the project are located and “include” where all the header files of the project are located.
The ‘platformio.ini’ file
This file is like the “instruction manual” for your project. This specifies which microcontroller you are using, which libraries are needed, and how everything should be configured.
The “src” folder
This is where you keep the most important code of your project. This contains files with the extension ‘.c’ for C code and ‘.cpp’ for C++ code.
The name “src” stands for “source”, which means that this is the source code of your project.
Because PlatformIO does not, like the Arduino IDE, place all code files one after the other, each ‘.c’ or ‘.cpp’ file is a separate object. Without special instructions, these independent objects know nothing about each other.
The “include” folder
In this folder you store files with “preparatory” code, also called header files. A header file is usually used to define your code’s “interface” between different objects, especially if you want to use functions, variables, or classes in other files. Header files have the extension ‘.h’.
Example of what such a project looks like in PlatformIO
Imagine you have a project called ‘MyProject’. This is what the structure could look like:
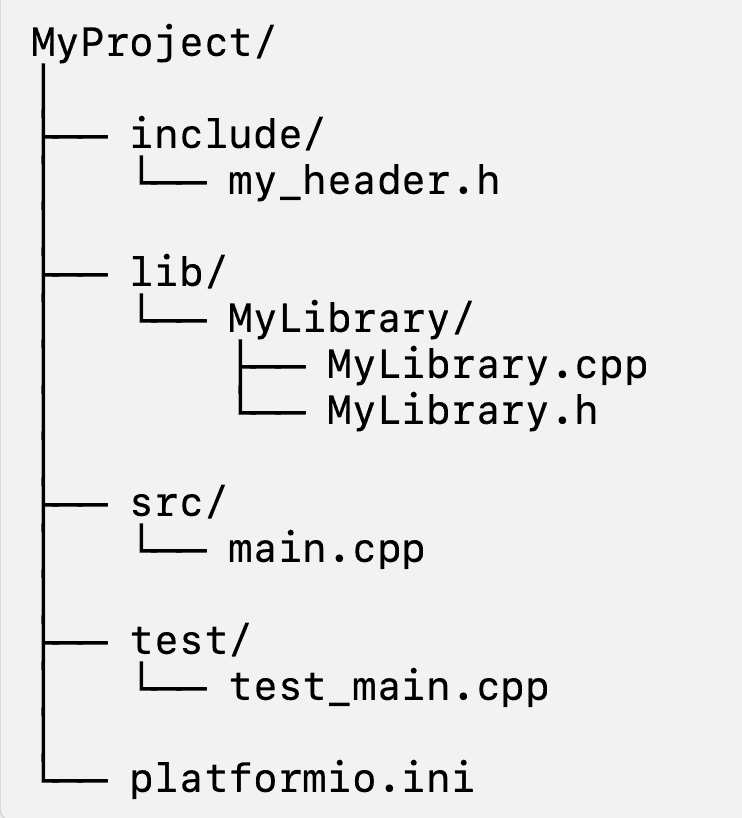
‘main.cpp‘ contains the code of your project.
‘my_header.h‘ is a header file with code that you can use in multiple places in your project.
‘platformio.ini‘ is the file that gives PlatformIO the instructions on how to build and run the project.
Everything defined or recorded in ‘my_header.h‘ becomes available or affects all other ‘.c’ or ‘.cpp’ files that include this header file via the ‘#include “my_header.h”‘.
The conversion program
Now that we know what the Arduino IDE does to compile a complex project and we know what a project looks like in PlatformIO, it should be possible to write an automatic conversion program for this. I list the steps this conversion program must go through to perform this task.
Step 1
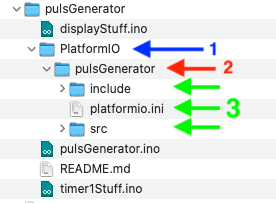
In this step the directory structure for a PlatformIO project must be set up. I have chosen to create a new folder “PlatformIO” in an Arduino project (whose top directory always has the same name as the “main” .ino file). Below this folder there will be a second folder with the name of the Arduino project. See the picture below of the original Arduino project “pulseGenerator”:
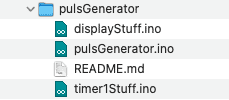
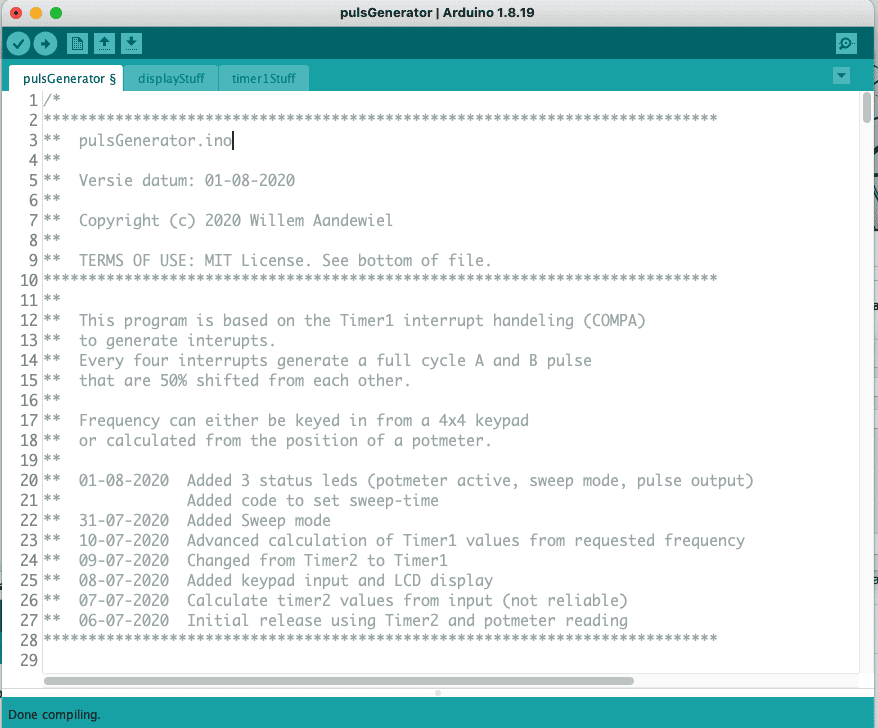
As you can see, this project consists of three ‘.ino’ files. In the Arduino IDE it looks like this:
It is good to know that the Arduino IDE ignores all files that do not have the extension ‘.ino’, ‘.c’, ‘.cpp’ or ‘.h’.
The ‘README.md’ file that is indeed in the project directory is therefore not ‘seen’ by the Arduino IDE. The same applies to the ‘PlatformIO’ folder that the conversion program will create.
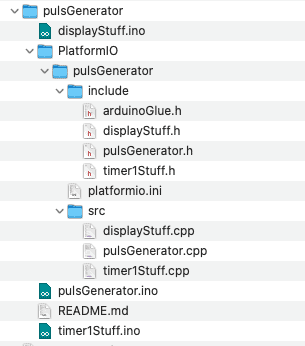
After Step 1 the file structure will look like this:
- This is the named PlatformIO directory (this directory and all subdirectories and files are not visible in the Arduino IDE)
- This is the PlatformIO project Folder
- The “src” and “include” folder and a template for the platformio.ini file
Step 2
In this step, all existing ‘.ino’, ‘.c’ and ‘.cpp’ files are copied to the “src” folder and any existing ‘.h’ files are copied to the “include” folder.
Now all globally defined variables, constant pointers, function definitions and “#include” statements are put into tables. The “#include” statements found in the ‘.ino’ files are adapted there into comments.
//#include <Wire.h>                //-- moved to arduinoGlue.h
//#include <LiquidCrystal_I2C.h>   //-- moved to arduinoGlue.h
Header Guards are applied to any existing header files (if they are not already present).
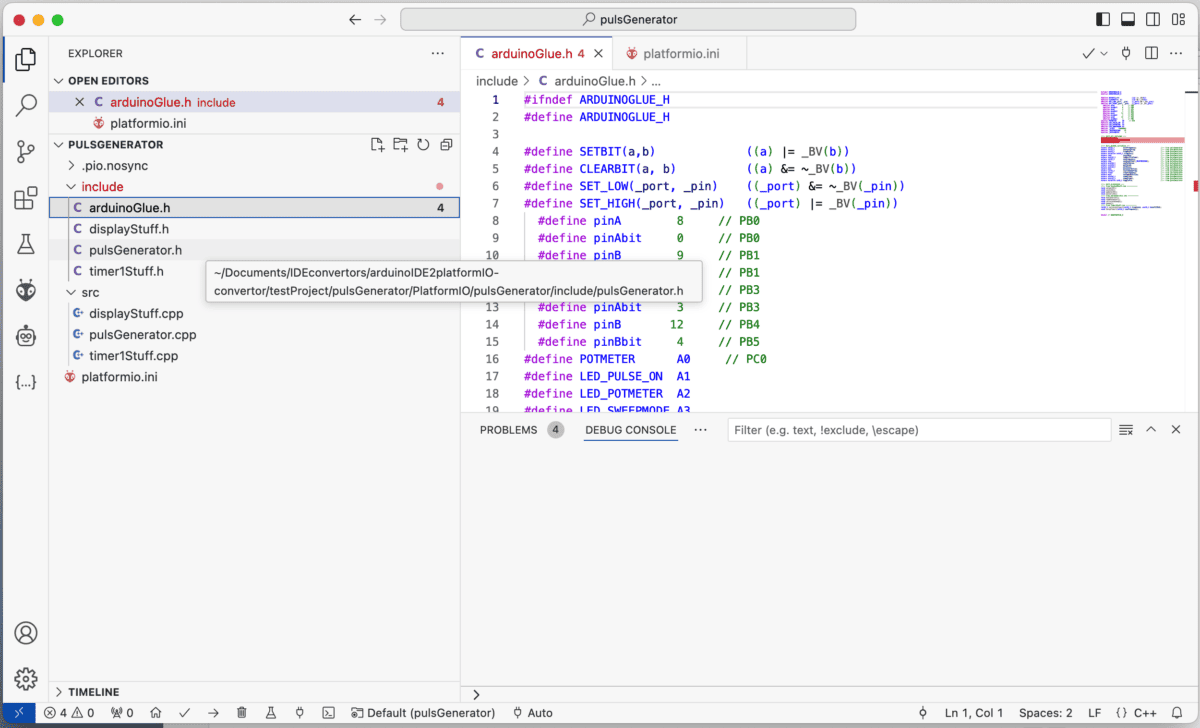
Then all data from the previously created tables are put into a new “arduinoGlue.h” file where global variables are given the prefix “external”. This has the same effect as “prototypes”. The compiler knows that such a variable will be declared “somewhere”, but it does not need to know where that declaration will take place. That is a task that the “linker” will figure out. This header file now contains all the data for the other files for error-free compilation.
#ifndef ARDUINOGLUE_H
#define ARDUINOGLUE_H

#define SETBIT(a,b)             ((a) |= _BV(b))
#define CLEARBIT(a, b)          ((a) &= ~_BV(b))
#define SET_LOW(_port, _pin)    ((_port) &= ~_BV(_pin))
#define SET_HIGH(_port, _pin)   ((_port) |= _BV(_pin))
  #define pinA        8     // PB0
  #define pinAbit     0     // PB0
  #define pinB        9     // PB1
  #define pinBbit     1     // PB1
  #define pinA       11     // PB3
  #define pinAbit     3     // PB3
  #define pinB       12     // PB4
  #define pinBbit     4     // PB5
#define POTMETER      A0     // PC0
#define LED_PULSE_ON  A1
#define LED_POTMETER  A2
#define LED_SWEEPMODE A3
#define _CLOCK    16000000
#define _MAXFREQCHAR    20
#define _HYSTERESIS      5

//-- dict_all_includes ---
#include <Wire.h>
#include <LiquidCrystal_I2C.h>
#include <Keypad.h>

//-- dict_global_variables ---
extern int32_t         diffFrequency;                         //-- from pulsGenerator
extern int32_t         endSweepFreq;                          //-- from pulsGenerator
extern uint8_t         freqKeyPos;                            //-- from pulsGenerator
extern volatile int32_t frequency;                            //-- from pulsGenerator
extern char            inputKey;                              //-- from pulsGenerator
extern uint32_t        ledBuiltinTimer;                       //-- from pulsGenerator
extern int32_t         newFrequency;                          //-- from pulsGenerator
extern char            newInputChar[_MAXFREQCHAR];            //-- from pulsGenerator
extern uint16_t        newPotValue;                           //-- from pulsGenerator
extern uint16_t        potSaved;                              //-- from pulsGenerator
extern uint16_t        potValue;                              //-- from pulsGenerator
extern bool            potmeterActive;                        //-- from pulsGenerator
extern int32_t         startSweepFreq;                        //-- from pulsGenerator
extern float           stepFrequency;                         //-- from pulsGenerator
extern bool            sweepModeActive;                       //-- from pulsGenerator
extern uint32_t        sweepTime;                             //-- from pulsGenerator
extern uint32_t        sweepTimer;                            //-- from pulsGenerator
extern volatile int8_t togglePin;                             //-- from pulsGenerator

//-- dict_prototypes ---
//-- from displayStuff.ino -----------
void setupLCD();
void initLCD();
void updateLCD();
void easterLCD();
//-- from pulsGenerator.ino -----------
void explanation();
void readPotmeter();
void calculateSweep();
void sweep();
//-- from timer1Stuff.ino -----------
int32_t calculateTimer1(int32_t freqAsked, uint8_t &newTCCR1B);
void setupTimer1(int32_t newFrequency);

#endif // ARDUINOGLUE_H
Step 3
In this step, a header file is created for all ‘.ino’ files with Header Guards and a ‘#include “arduinoGlue.h”’ (this does not happen for ‘.c’ and ‘.cpp’ files because, if they are used in the original Arduino project, must already have a ‘.h’ file).
Step 4
In the “main project” file (in our example “pulsGenerator.ino”) a “#include” statement is inserted before all other header files so that the ‘.cpp’ objects with the same name are included. In this example project these are:
#include “arduinoGlue.h”
#include “displayStuff.h” //-- voor ‘displayStuff.cpp’
#include “timer1Stuff.h”  //--voor ‘timer1Stuff.cpp’
Step 5
Now all ‘.ino’ files in the “src” directory will be renamed to ‘.cpp’ files.
After the conversion, the directory structure will look like this:
What remains
What remains and cannot be automated is adjusting the ‘platformio.ini’ file.
Where can you find the conversion program?
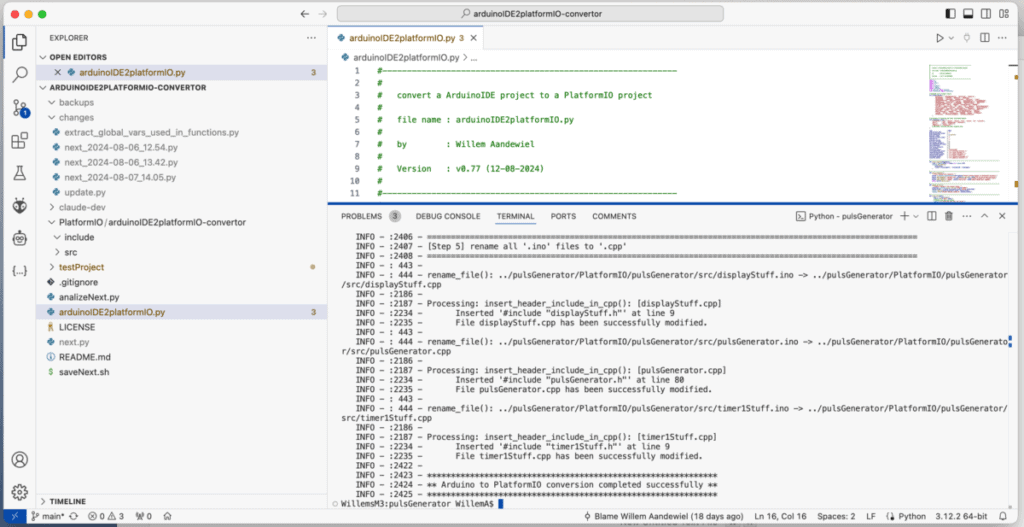
This repo contains the “arduinoIDE2platformIO.py” conversion program. In this repo there are two example Arduino projects in the “test project” folder that you can convert into a PlatformIO project with this program as a test.
And what if you want to create an Arduino IDE version of a PlatformIO project?
That conversion is a lot easier. In this repo you will find the “platformIO2arduinoIDE.py” program that will do this automatically for you!
 Follow
Hello, I just attempted the conversion of my arduino IDE project consisting of 16 .ino programs and several structs in the main program. These defines are unknown in other modules that call the structure.name.element. How can I make these defines of structure global so the other modules (ino programs) can see the elements?
Thanks for you work. Been trying to figure out how to get this project over to platformio for several years.
Hi David,
From the top of my hat: You should declare them in the “arduinoGlue.h” file as “external” as they are declare “global” in the original file. As “arduinoGlue.h” is included in all other files they all know of the existence of these variables.
Global variables
If you declare a variable outside a function (i.e. not inside the curly braces ‘{}’ of a function), then by merging all ‘.ino’ files through the Arduino IDE, this variable is global and available to all functions in all merged ‘.ino’ files. For example, a variable ‘int sensorValue;’ declared in ‘sensor.ino’ can be used in ‘myProgram.ino’ or ‘display.ino’ without any problems.
Hi, thanks for sharing your converter!
in my case, it finishes with the error:
INFO – :2863 – =======================================================================================================
INFO – :2864 – [Step 5] add all local includes to the ‘project_name.ino’ file (insert ‘#include “x.h”‘ to x.ino)
INFO – :2865 – =======================================================================================================
INFO – :1388 –
INFO – :1389 – Processing: add_local_includes_to_project_header(): testProject
ERROR – :1451 – An error occurred at line 1394: [Errno 2] No such file or directory: ‘/Users/igorlab/Dropbox/Projects/Clion/test_ino2clion/arduinoIDE2platformIO-convertor-main/testProject/PlatformIO/testProject/include/testProject.h’
Can you please help me figure out what it can be?
Hallo Ihor,
Heb je de versie van github geprobeerd?
Hi, I came across your fine project for converting in0. files to platform code.
Unfortunately there is no info in the read.me. would like to try it on Mac OS.
Any info how to use it?
thank you
Branko
Hi Branko,
You are right. I have to put that somewhere in the post or (and) in the README.md of the repo.
1) You have to clone the repo to your computer.
2) In a terminal window you ‘cd’ to the folder where you cloned the repo.
3) Then you type “python3 arduinoIDE2platformIO.py –project_dir <pathToArduinoProject>
(there are two ‘-‘ before ‘project_dir’)
The converted project is located in <pathToArduinoProject>/platformIO/
All you have to do is edit the ‘platformio.ini’ file to your needs.
Mind you: the convertor will not always do everything for you. Sometimes you have to iterate a compile -> solve compile errors -> compile -> solve compile errors.
If it compiles without errors test it. If it works as expected you can cleanup the ‘arduinoGlue.h’ file with the ‘crossReference.py’ file.
Have fun!